Jenkins is a widely-used open-source Continuous Integration (CI) tool. It helps in implementing the CI/CD workflow to build pipelines that automate the testing of a large codebase and facilitates the integration of separate branches of code into the main branch. It prepares the code for deployment/delivery into containers and virtual machines.
For instance, if you are a developer and you have made some changes to the code, you must commit those changes in the central repository. Jenkins will test and compile the code ensuring that there are no errors in the environments before deploying the code. If it finds any bug/error, it will ask you to fix them first.
How is Jenkins Making the Life of DevOps Teams Better?
One of the significant problems that a DevOps team faces is fragmented or inefficient workflows. Jenkins eliminates the inefficiencies in the build cycle by allowing the developers to compile their code from a shared version-control repository. It will enable you to automate your testing that can help in setting up the system to run various unit tests for your code.
The Jenkins tool is backed and operated by an active and robust open-source community that has developed hundreds of useful plugins. Jenkins plugins can make your continuous integration smoother by eliminating the need to create half-tested logic to accomplish tasks, solving everyday problems with minimal effort, and also to promote reusability across projects.
The plugins are simple to use. A DevOps engineer can download them from the Update Center along with the necessary dependencies. The Update Center is a service that is operated by the Jenkins project and provides an inventory of open-source plugins, which is developed and maintained by various members of the Jenkins community.
DevOps has become an essential practice for frequently releasing the software build. If you want to measure the success of your DevOps efforts better, you can read this blog.
Best Jenkins Plugins to Enhance Collaboration in DevOps
The plugins help in increasing the capabilities of Jenkins by adding some useful features that might help you to enhance productivity and make your build space more secure. In this blog, we have shared some plugins that were extremely useful for our projects.
#1 Kubernetes Plugin
This plugin runs the agents that are dynamic on the Kubernetes cluster. It creates pods for each agent that is defined by the Docker image to run and terminate it after each build. It allows the developers who use Kubernetes to automate the scaling process of running Jenkins slaves in the Kubernetes environment.
To set up this plugin, you need to add the Kubernetes cluster in your Jenkins configuration. To do this, browse to
Manage Jenkins > Configure System > Cloud > Select 'Kubernetes'.
The server certificate key, user name, and password are available in kubectl configuration (~/.kube/config).
#2 AWS CodeDeploy Plugin
After you have a successful build ready, the next step is deployment. The AWS CodeDeploy plugin helps you with the post-build steps for your Jenkins project. It is a service that coordinates the deployment of applications into multiple AWS instances. With the help of this plugin, you can use CodeDeploy as a Continuous Delivery pipeline by rolling out the zip file into the Amazon instances fleet.

Steps to configure this plugin is straightforward:
Manage Jenkins > Manage Plugins > Choose "Deploy to container Plugin” > install the plugin > Restart the Jenkins server.
In Configure option-> Choose the option “Deploy war/ear to a container.”
In the Deploy war/ear to a container section > Remote Server details > Save.
#3 Blue Ocean Plugin
This plugin enhances the experience of the user with a modern, personalized design by reducing complexity and increasing visibility. When you create a pipeline for a Git server for the first time, Blue Ocean prompts for the credentials to access the repositories on the Git server.
The Blue ocean plugin writes the Jenkins file to the repository. After installing the Blue Ocean plugin, you can start using it by clicking on “Open Blue Ocean” on top of the navigation bar. You can also add “/blue” to the Jenkins URL to access the Blue Ocean.

To install Blue ocean plugin:
Login to Jenkins server > Click ‘Manage Jenkins’ > Manage Plugins > Search for Blue Ocean plugin > Click the checkbox in the Install column > Click either ‘Install without restart’ or ‘Download now and install after restart.’
#4 Maven Integration Plugin
We can use Maven with Jenkins to build projects (maven projects) and produce the corresponding JAR or WAR build artifacts. This plugin is used to build projects that use Apache Maven in Jenkins. Jenkins reads the project dependencies from the POM file and builds the artifacts. It is also used to trigger jobs based on SNAPSHOTs published/consumed automatically. Jenkins understands all kinds of dependencies in POM, like:
<dependency>
<groupId>org.apache.maven</groupId>
<artifactId>maven-plugin-api</artifactId>
<version>3.6.0</version>
</dependency>
For installing the Maven Integration Plugin:
Log in to the Jenkins account > Manage Jenkins > Select Manage Plugins > Select the Available tab > Find the Maven Integration plugin and install it.
#5 JIRA Plugin
JIRA is a popular and widely used ticketing tool. The JIRA plugin integrates JIRA with Jenkins to work on a project in an organized manner among the teams to track issues. This plugin can update JIRA issues with a back pointer to Jenkins build pages, which is accomplished using JIRA REST APIs.
To configure this plugin, you must add JIRA sites in Jenkins; the plugin will automatically hyperlink all matching issue names to JIRA.
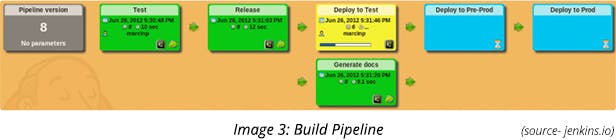
#6 Build Pipelines Plugin
The Build Pipeline plugin visualizes your upstream- and downstream-connected jobs in a prettified view and gives you an excellent overview of your build process, from start to finish. It allows you to fit external processes, such as a review before deployment, into your pipeline by adding manual triggers to your jobs.
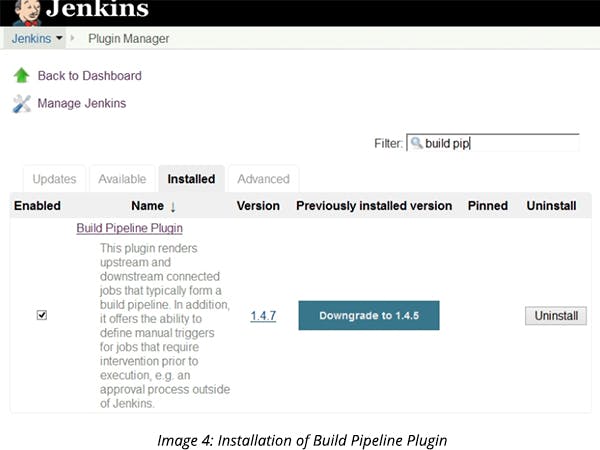
To install the build pipeline plugin navigate to
Jenkins > Manage Jenkins > Build Pipeline Plugin.
#7 ThinBackup Plugin
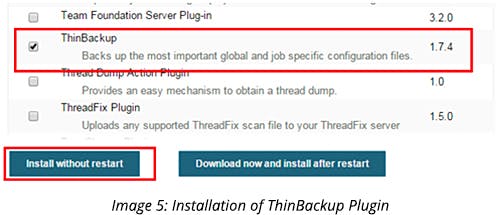
When things go wrong, this plugin helps you in managing your job’s backup and configurations with its build history. Its main feature of automated backups is way better than any other backup plugin, and it can be configured effortlessly. You can tweak a backup setting with the help of a backup manager, which can trigger a backup job either manually or automatically.
Backups are arguably the single most crucial step you need to take in case of data loss or intrusion attack.
To install the plugin, go to the
Jenkins home page > Manage Jenkins > Manage plugins > Select ThinBackup plugin and install.
#8 Docker Build Step Plugin
Do you wish to provision the nodes dynamically? Docker is the new thing for such implementations. And hence, this plugin is used for one such reason—dynamic slave provisioning.
We can use various docker commands in the jobs as build steps.
This plugin is capable of handling the following tasks:
- Create new containers from docker images
- Kill the containers
- Pull and push the image from and to repositories
- Start and stop the containers
- Commit specific changes to the containers
To use this plugin, we must ensure that the docker service is running on slaves where the build is running. Mention the Docker API URL in Jenkins global configurations and provide steps for the build that you would like to perform as a part of your job configuration.
To install the plugin, navigate to
Jenkins > Manage Plugins > docker-build-step.

#9 Jenkins Disk-usage Plugin
Analyzing disk usage primarily ensures smoother execution for the upcoming builds and avoids any surprises during heavy disk consumption. This plugin helps in calculating the disk consumption while keeping a check on performance impact on the Jenkins master server.
Once the plugin is installed, the disk consumption is calculated every 60 minutes. To view the usage, you could navigate to
Jenkins Dashboard > Manage Jenkins > Disk Usage.
The above page also allows you to schedule the disk usage calculation. You can check the calculations immediately.
#10 Amazon EC2 Plugin
Consider a scenario where you need to copy your build to a remote EC2 machine and efficiently manage the build cluster load. You can use ‘Publish over ssh’ plugin or use the “SCP” command in a shell script from the post-build task to copy or load the artifacts to a remote server. However, these options won’t effectively manage the load. To efficiently set up the working case between EC2 and Jenkins, you can use the Amazon EC2 plugin that helps in performing the task of copying artifacts as well as manage the load for Jenkins.
After you install this plugin, you need to configure the connection details. From the Jenkins configure page, select the option “Amazon EC2.” You must have a secret key, an access key to establish the connection to the Amazon console, and a private key to operate at the instance level.
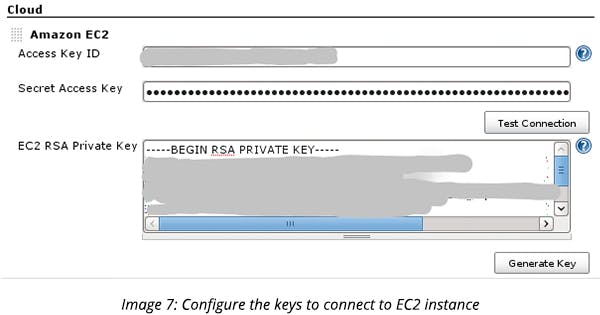
You can also configure Jenkins to automatically start the instances when the load increases and automatically terminate the instances when it is idle for 30 minutes or more.
To install this plugin:
Manage plugins screen > “Available” tab > Select the checkbox for ‘Amazon EC2’ > Click “Download now and install after restart” button > Restart Jenkins after the installation is complete.
To conclude, the developers must consider Jenkins plugins to improve or increase productivity as they have valuable features to accomplish various tasks. There are 100’s of other plugins available to enhance the power and usability of the Jenkins tool that would further make continuous integration smoother.

Vilas Mankala
Sr. DevOps Engineer
Published Mar 02 2020