Azure DevOps allows easier and faster creation of build and release pipelines. It allows you to build, test, and deploy with continuous integration/continuous delivery (CI/CD) that is compatible with any language, platform, and cloud. It connects with GitHub (or any Git provider) and performs continuous deployments. It also provides cloud-hosted pipelines for Linux, macOS, and Windows, and builds for desktop, web, and mobile applications.
Benefits of using Azure Pipelines with Salesforce Commerce Cloud (SFCC):
- Build, test, and deploy Java, PHP, Ruby, C/C++, .NET, Node.js, Python, Android, and iOS apps.
- Easily build and deploy the images to containers like Docker Hub and Azure Container Registry. Deploy containers to individual hosts or Kubernetes.
- Implement community-built build, test, and deployment tasks, along with hundreds of extensions from Slack and SonarCloud.
- Ensure rapid CI/CD pipelines for every open-source project.
- Take advantage of chaining builds and multi-phased builds – support for YAML, test integration, release gates, reporting, and more.
- Implement continuous delivery of your solution to any cloud, such as Azure, AWS, or GCP.
Creating Azure Pipelines
The following section explains how to code a build pipeline and create a release pipeline. To build code from a repository (in this case Azure Repos), you must create a YAML file named: azure-pipelines.yml. This YAML file must include steps and tasks to create necessary configuration files and scripts. These tasks and scripts can also be added at different stages.
Let’s consider having a Node.js-based project that uses gulp.js for linting and building. Since this is a Salesforce-based project, the user can utilize a build pipeline to deploy (i.e., upload code to the Salesforce instance) as well as use the following YAML:
trigger:
  batch: true
  branches:
    include:
    - master
    - develop
pool:
  vmImage: 'ubuntu-latest'
steps:
- task: NodeTool@0
  inputs:
    versionSpec: '12.16.3'
  displayName: 'Install Node.js'- script: |
    npm install
    npm install sgmf-scripts
  displayName: 'Install node modules'- task: Bash@3
  inputs:
    targetType: 'inline'
    script: |
      echo "Creating dw.json"
      echo '{
          "hostname": "$(hostname)",
          "username": "$(username)",
          "password": "$(password)",
          "code-version": "$(code-version)"
      }' > dw.json
      echo "Created dw.json"
    failOnStderr: true
    displayName: 'Create SFCC Config JSON'- script: |
    gulp lint
    gulp build
  displayName: 'Lint and Build using Gulp'- script: |
    npm run uploadCartridge "app*, int*, bc*"
  displayName: 'Upload cartridges'
Find the details of each section of this YAML file below:
- Trigger: Provides control that allows build to trigger for listed branches, like develop, master, release, etc.
- Pool: Azure Pipelines provide a Microsoft-hosted agent pool, named Azure Pipelines. You can choose from several virtual machine images where each image includes a broad range of tools and software.
Steps to Code a Build Pipeline
Find the detailed steps below:
Step 1: Install Node.js (latest LTS as of today)
task: NodeTool@0
  inputs:
    versionSpec: '12.16.3'
  displayName: 'Install Node.js'
Step 2: Install script (sgmf-scripts) to install dependencies mentioned in package.json present in the repository at the same level as the YAML file.
script: |
    npm install
    npm install sgmf-scripts
  displayName: 'Install node modules'
This task is important as it creates a configuration file used by the sgmf-scripts package. Here, dw.json config file is created dynamically using variables — an out-of-the-box feature from Azure DevOps.
Example:
$(hostname), $(username),…
task: Bash@3
  inputs:
    targetType: 'inline'
    script: |
      echo "Creating dw.json"
      echo '{
          "hostname": "$(hostname)",
          "username": "$(username)",
          "password": "$(password)",
          "code-version": "$(code-version)"
      }' > dw.json
      echo "Created dw.json"
    failOnStderr: true
    displayName: 'Create SFCC Config JSON'
Step 3: The next script to be installed is commonly used for linting and building frontend changes of the project.
script: |
    gulp lint
    gulp build
  displayName: 'Lint and Build using Gulp'
Step 4: Execution of the last script uploads SFCC code cartridges.
script: |
    npm run uploadCartridge "app*, int*, bc*"
  displayName: 'Upload cartridges'
Once code is pushed to the configured branches, build automatically triggers and uploads code on an SFCC instance.
Steps to Create a Release Pipeline
These pipelines provide release power to multiple servers or instances when they are scheduled to be deployed with the same build artifact – example, for Salesforce, there are development (QA), staging (pre-production), and some sandbox (UAT) servers.
Listed below are some more options from Azure DevOps that can be utilized to write the Task(s), which can be executed once and utilized in multiple stages.
Option 1: Library
Variable groups holding multiple variables can be created with a library for different server instances. One such example is given below:
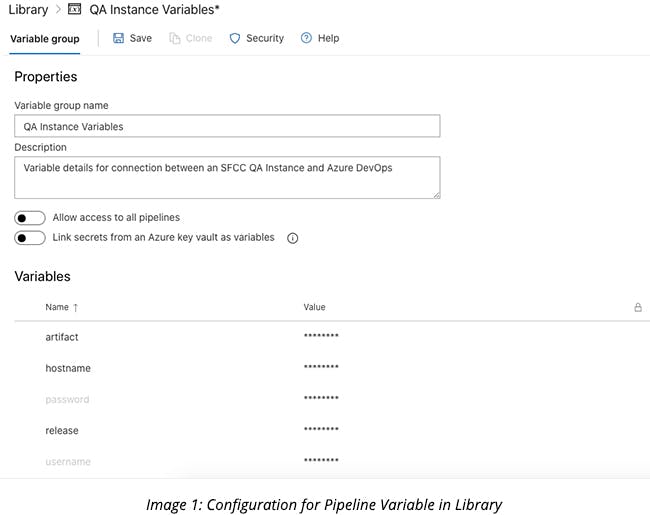
These variables can be used in Tasks created for the release pipeline. These tasks can also be clubbed together to create a task group, which is explained as Option 2 below.
Option 2: Task Groups
A task group can have two or more tasks clubbed together. It can be used for different release pipelines having common task features and functionality. One such example is given below:
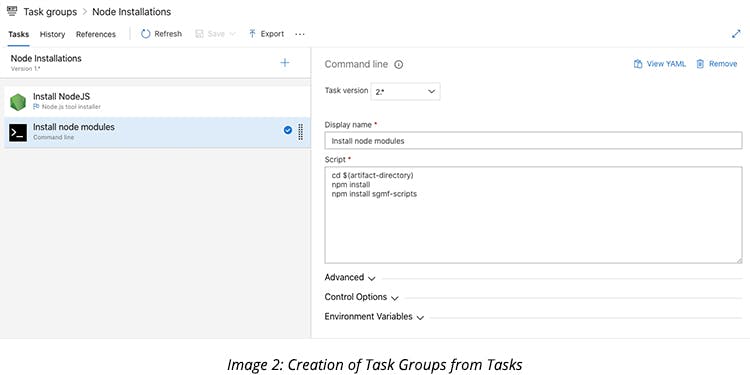
Like this task group, there can be multiple task groups and each of them can be used to create a stage for a release pipeline.
How to create a task group?
- You can select an option to add tasks while adding a release pipeline.
- Once the tasks are added, select the tasks that you want to club together for a task group.
- Right-click and create a task group.
Once all the necessary task groups are created, add different stages to build and deploy the artifact. See how these can be set up in the sequence below:
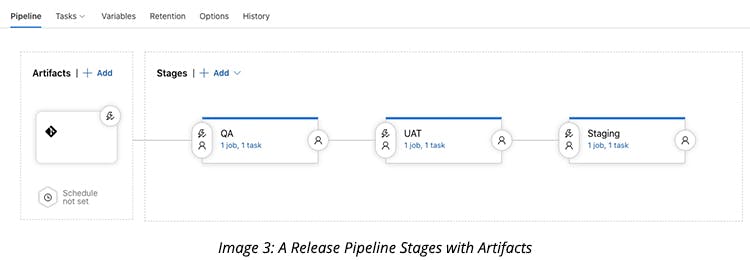
You can build and deploy an artifact to QA, UAT, and staging instances of Salesforce with a single release pipeline. An important thing to note here is that you can set up a code branch to trigger the build of your choice while ensuring that each stage has a job with a task.
The screenshot below shows a single task doing the build and deploying within a single task group:
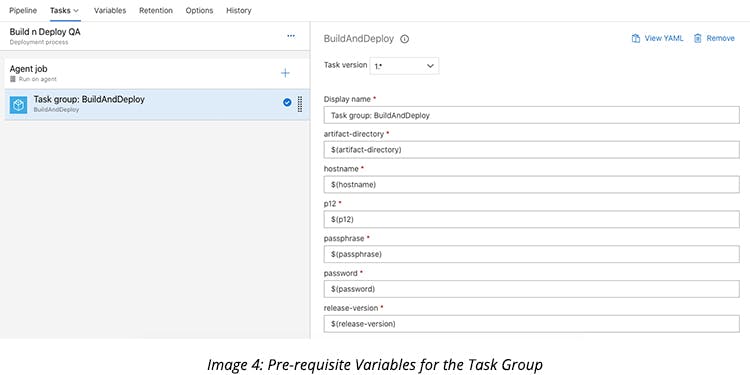
With these simple steps, the setup becomes easy and flexible.
Best Practices for Integrating Salesforce Commerce Cloud with Azure DevOps
Below are some of the best practices for integrating Salesforce Commerce Cloud with Azure DevOps.
- Ensure that the credentials are secured/locked when adding them to ‘Variables.’
- Create instance-specific library details instead of clubbing them into a single library.
- Ensure using a single parallel job instead of multiple to avoid additional costs.
- Verify task groups before using them and assure that the task variable is appropriately defined.
- Avoid creating each stage with separate tasks instead of the task group because it is challenging to maintain and modify.
- Never hard-code your credentials in the configuration file. It should not be exposed.
- Don’t go with a parallel build and deploy, instead use a sequential process.
To integrate Salesforce with Azure DevOps pipelines, a Salesforce account manager access is necessary along with the subscription of Azure DevOps. Since the repository, along with Artifacts and pipelines, lives in a single tool, you do not require a cloud provider other than Azure DevOps. Hence, it’s very easy and efficient to set up as compared to Jenkins on different cloud platforms.

Mohit Sachdeva
Sr. Technical Lead
Published Sep 18 2020